E2E 自动化 HarnessThe E2E harness
用语义定位驱动真实的 Zenit 窗口,并把虚拟光标、PNG 截图与 H.264 录像变成可审阅的证据。Drive a real Zenit window by semantic locators, and turn the virtual cursor, PNG screenshots and H.264 recordings into reviewable evidence.
测试真实窗口,而不是网页替身Test the real window, not a web stand-in
Harness 只存在于以 -Dtest-mode=true 构建的应用里。TypeScript 控制器把请求写进私有的 file-RPC 目录,应用主线程在处理完平台事件后排空命令队列:点击仍然走真实的 hit-test,输入仍然走组件事件,截图读取的是已经呈现的 drawable。The harness exists only in apps built with -Dtest-mode=true. A TypeScript controller writes requests into a private file-RPC directory, and the app’s main thread drains the command queue after platform events: clicks still go through real hit-testing, input still goes through component events, and screenshots read the drawable that was actually presented.
写第一个真实窗口测试Writing a first real-window test
优先用 test_id 定位,不要把像素坐标写死。需要展示真实光标轨迹时,用 screenPos 取语义节点当前的 rect,再发送细粒度的鼠标序列。Locate by test_id rather than hard-coded pixels. When you want a visible cursor path, read the node’s current rect with screenPos and send a granular mouse sequence.
import { mkdir } from "node:fs/promises";
import {
  waitForServerReady, screenPos, mouseMove, clickAt,
  imePreedit, imeCommit, inputState, screenshot,
  startWindowRecording, stopWindowRecording,
} from "../zig-out/share/zenit/harness/client.ts";

const out = "/tmp/myapp-e2e-artifacts"; // absolute; must exist before recording
await mkdir(out, { recursive: true });

await waitForServerReady();
await startWindowRecording(`${out}/ime.mp4`, { fps: 30 });

// Locate by test_id, never by hard-coded pixels.
const field = await screenPos("profile.name");
const x = field.x + field.w / 2;
const y = field.y + field.h / 2;
await mouseMove(x, y);
await clickAt(x, y);

await imePreedit("nihongo", 7); // cursor offset in UTF-8 bytes
await screenshot(`${out}/preedit.png`);
await imeCommit("日本語");

const state = await inputState("profile.name");
if (state.buffer !== "日本語" || state.ime_preedit_len !== 0) {
  throw new Error(JSON.stringify(state));
}

const video = await stopWindowRecording(); // returns once the MP4 is finalized
if (!video.ok || video.dropped_frames !== 0) throw new Error(video.error);虚拟光标为什么重要Why the virtual cursor matters
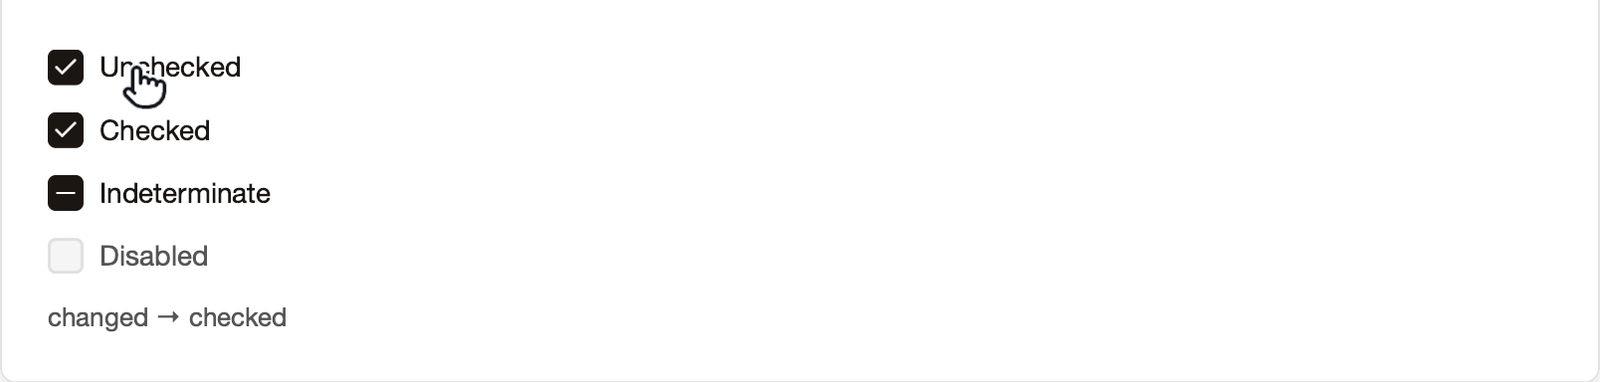
系统截图通常抓不到物理光标,屏幕录制又会带上桌面、标题栏和权限提示。Zenit 的虚拟光标是最后一层 draw-only overlay:不创建 Node、不参与布局或命中,只把当前自动化坐标与解析后的 CursorShape 画进应用的 render target。System screenshots usually miss the physical cursor, and screen recording drags in the desktop, title bar and permission prompts. Zenit’s virtual cursor is a final draw-only overlay: it creates no Node and takes no part in layout or hit-testing — it just paints the current automation position and the resolved CursorShape into the app’s render target.
输入框上是 I-beam,按钮上是 hand,拖动从 grab 变为 grabbing;遵守 pointer capture 与 cursor override。I-beam over inputs, hand over buttons, grab turning into grabbing on drags; pointer capture and cursor overrides apply.
按住时出现蓝色 press ring;原子 click 释放后保留 180ms 的 pulse。A blue press ring while the button is held; an atomic click leaves a 180 ms pulse after release.
Retina 应用内容加虚拟光标;没有桌面、物理光标、标题栏或屏幕共享标记。Retina app content plus the virtual cursor — no desktop, physical cursor, title bar or screen-sharing badge.
拖动与多击Drags and multi-clicks
指针拖动用 mouseDown / mouseMove / mouseUp 组合,经过和真实鼠标相同的拖动阈值、pointer capture 与手势仲裁。双击、三击就是在多击间隔内连续发送 clickAt。Pointer drags are mouseDown / mouseMove / mouseUp sequences and go through the same drag threshold, pointer capture and gesture arena as a physical mouse. Double and triple clicks are consecutive clickAt calls within the multi-click interval.
import { mouseDown, mouseMove, mouseUp, screenPos, sleep, clickAt } from "../zig-out/share/zenit/harness/client.ts";

// Pointer drag: press, move in steps, release. Real hit-testing and
// pointer capture apply; the virtual cursor shows grab -> grabbing.
async function drag(from: { x: number; y: number }, to: { x: number; y: number }, steps = 10) {
  await mouseDown(from.x, from.y);
  for (let i = 1; i <= steps; i++) {
    const k = i / steps;
    await mouseMove(from.x + (to.x - from.x) * k, from.y + (to.y - from.y) * k);
    await sleep(35);
  }
  await mouseUp(to.x, to.y);
}

const box = await screenPos("story.drag.box");
const c = { x: box.x + box.w / 2, y: box.y + box.h / 2 };
await drag(c, { x: c.x + 140, y: c.y + 40 });

// Double click: two clicks inside the platform's multi-click interval.
const pad = await screenPos("story.multiclick.pad");
await clickAt(pad.x + pad.w / 2, pad.y + pad.h / 2);
await sleep(160);
await clickAt(pad.x + pad.w / 2, pad.y + pad.h / 2);常用 APIAPI map
tree · query(testId) · screenPos · focusedclickTestId · clickAt · mouseDown/Move/Up · scrollAt · magnifyAt · keydragAt(x, y, kind, paths)type_ · imePreedit · imeCommit · inputStateconsoleEvents · waitForConsole · clearConsole · stats · resetTimingscreenshot · startWindowRecording · windowRecordingStatus · stopWindowRecordingwaitForServerReady · waitFor · resizeWindowtree 返回完整子节点列表(不再每层只留前 50 个;深度仍以 20 层为限),结果超过 256 KB 的结果缓冲时显式报错,而不是返回半截 JSON。query 命中的每个节点带 effective_opacity(自身 × 全部祖先的 opacity,display:none 计 0),display:none 的节点带 hidden: true。等浮层淡入时轮询到 effective_opacity >= 0.99 再点击,比 sleep 猜动画时长可靠。typed client 的 QueryNode 接口目前还没声明这两个字段,读取时需要自己扩展类型。tree returns every child (the old 50-children-per-level cap is gone; depth is still capped at 20), and a result that overflows the 256 KB result buffer is an explicit error rather than half a JSON document. Each node matched by query carries effective_opacity — its own opacity times every ancestor’s, 0 under display:none — and display:none nodes carry hidden: true. To wait for an overlay to fade in, poll until effective_opacity >= 0.99 before clicking instead of sleeping for a guessed duration. The typed client’s QueryNode interface doesn’t declare these two fields yet, so extend the type when you read them.
drawable 直录Recording the drawable
macOS 录制路径在 GPU 上把完成的 Metal drawable blit 进 AVAssetWriterInputPixelBufferAdaptor 的 buffer pool,再由 AVFoundation 编码为 H.264;没有 CPU 像素回读,也不需要「屏幕录制」权限。stopWindowRecording 是同步边界:返回时 MP4 的 index 与最后一帧都已写完。On macOS, the recorder blits each finished Metal drawable on the GPU into an AVAssetWriterInputPixelBufferAdaptor buffer pool, and AVFoundation encodes H.264 — no CPU pixel readback, no Screen Recording permission. stopWindowRecording is a synchronous boundary: when it returns, the MP4 index and the last frame are written.
fps1–120,默认 601–120, default 60ok · width · height · frame_count · dropped_frames · duration_ms · file_size构建与运行Build and run
Zig 的依赖选项是隔离的:下游项目要在自己的 build.zig 里把 test-mode 与 e2e-port 转发给 zenit 依赖,并调用 zenit.installHarnessClient(b, zenit_dep),把 typed client 安装到 zig-out/share/zenit/harness/client.ts。快速开始里的模板已经做好了这两件事。Zig dependency options are isolated, so a downstream build.zig must forward test-mode and e2e-port to the zenit dependency and call zenit.installHarnessClient(b, zenit_dep), which installs the typed client at zig-out/share/zenit/harness/client.ts. The template in Quick start already does both.
# The template's build.zig forwards -Dtest-mode / -De2e-port to the zenit
# dependency and calls zenit.installHarnessClient(b, zenit_dep).
zig build -Dtest-mode=true

rpc_dir="$(mktemp -d /tmp/myapp-e2e.XXXXXX)"   # one private dir per run
ZENIT_E2E_FILE_RPC_DIR="$rpc_dir" ./zig-out/bin/myapp &
app_pid=$!

ZENIT_E2E_FILE_RPC_DIR="$rpc_dir" bun e2e/profile.test.ts
kill "$app_pid"# Inside the zenit repo: the Storybook ships as an .app bundle.
zig build -Dtest-mode=true storybook
rpc_dir="$(mktemp -d /tmp/zenit-e2e.XXXXXX)"
ZENIT_E2E_ISOLATE_POINTER=1 ZENIT_E2E_FILE_RPC_DIR="$rpc_dir" \
"./zig-out/zenit Storybook.app/Contents/MacOS/storybook" &
ZENIT_E2E_FILE_RPC_DIR="$rpc_dir" bun e2e/storybook.test.ts边跑测试边用电脑时,真实鼠标的移动、按键和滚轮会覆盖 Harness 注入的悬停位置。给应用进程设 ZENIT_E2E_ISOLATE_POINTER=1,test-mode 构建会丢弃系统的 mouse move / button / wheel / magnify 事件,只认 Harness 注入的输入;zenit 自己的 scripts/run_storybook_e2e.sh 默认开启,需要真实鼠标参与时设为 0。If you use the machine while tests run, the physical mouse’s moves, buttons and wheel override the hover position the harness injected. Set ZENIT_E2E_ISOLATE_POINTER=1 on the app process and a test-mode build drops system mouse move / button / wheel / magnify events, accepting only harness input; zenit’s own scripts/run_storybook_e2e.sh turns it on by default — set it to 0 when a real mouse should take part.
正常发布不传 -Dtest-mode=true:test_harness.enabled 是编译期常量,Harness 初始化与 file-RPC 端点会被整个消除。Normal release builds omit -Dtest-mode=true: test_harness.enabled is a compile-time constant, so harness setup and the file-RPC endpoint are compiled out entirely.
真实案例:本站的媒体流水线Real example: this site’s media pipeline
本站所有截图和录像都来自真实窗口,由两个脚本生成:scripts/zenit/run-capture.sh 负责构建和进程编排,scripts/zenit/capture.ts 负责驱动与录制。Every screenshot and clip on this site comes from a real window, produced by two scripts: scripts/zenit/run-capture.sh builds and orchestrates processes, and scripts/zenit/capture.ts drives and records.
- 1以 test-mode 构建目标Build the targets in test mode
在 zenit checkout 里执行
zig build -Dtest-mode=true storybook console-probe devtools-probe hello-button counter-reactive。Runzig build -Dtest-mode=true storybook console-probe devtools-probe hello-button counter-reactivein the zenit checkout. - 2每个场景一个私有 RPC 目录A private RPC dir per scenario
用
mktemp -d新建目录,带着ZENIT_E2E_FILE_RPC_DIR在后台启动 .app 里的二进制,再用同一个目录运行bun scripts/zenit/capture.ts <scenario>,结束后杀掉应用进程。Create a directory withmktemp -d, start the binary inside the .app in the background withZENIT_E2E_FILE_RPC_DIR, runbun scripts/zenit/capture.ts <scenario>against the same directory, then kill the app. - 3语义驱动并录制Drive semantically, record
capture.ts 直接 import zenit 的
e2e/client.ts,按 test_id 或树中的文本定位,以 30fps 录制,并断言ok且frame_count ≥ 2;某个 story 的交互失败时退化为通用光标扫过并记录警告,不中断整批。capture.ts imports zenit’se2e/client.tsdirectly, locates by test_id or tree text, records at 30 fps and assertsokplusframe_count ≥ 2; if a story’s interaction fails it falls back to a generic cursor sweep and logs a warning instead of aborting the batch. - 4裁剪、转码、记录版本Crop, transcode, stamp the revision
用 ffmpeg 裁到 Storybook 详情区域并重编码为 H.264(faststart),写入
public/media,最后把 zenit 的 commit 写进public/media/REVISION。ffmpeg crops to the Storybook detail pane and re-encodes H.264 (faststart) intopublic/media; finally the zenit commit is written topublic/media/REVISION.
ZENIT_DIR=/path/to/zenit scripts/zenit/run-capture.sh docs        # docs media
ZENIT_DIR=/path/to/zenit scripts/zenit/run-capture.sh stories drag  # one story clip