E2E 自动化 Harness
用语义定位驱动真实的 Zenit 窗口,并把虚拟光标、PNG 截图与 H.264 录像变成可审阅的证据。
测试真实窗口,而不是网页替身
Harness 只存在于以 -Dtest-mode=true 构建的应用里。TypeScript 控制器把请求写进私有的 file-RPC 目录,应用主线程在处理完平台事件后排空命令队列:点击仍然走真实的 hit-test,输入仍然走组件事件,截图读取的是已经呈现的 drawable。
写第一个真实窗口测试
优先用 test_id 定位,不要把像素坐标写死。需要展示真实光标轨迹时,用 screenPos 取语义节点当前的 rect,再发送细粒度的鼠标序列。
import { mkdir } from "node:fs/promises";
import {
  waitForServerReady, screenPos, mouseMove, clickAt,
  imePreedit, imeCommit, inputState, screenshot,
  startWindowRecording, stopWindowRecording,
} from "../zig-out/share/zenit/harness/client.ts";

const out = "/tmp/myapp-e2e-artifacts"; // absolute; must exist before recording
await mkdir(out, { recursive: true });

await waitForServerReady();
await startWindowRecording(`${out}/ime.mp4`, { fps: 30 });

// Locate by test_id, never by hard-coded pixels.
const field = await screenPos("profile.name");
const x = field.x + field.w / 2;
const y = field.y + field.h / 2;
await mouseMove(x, y);
await clickAt(x, y);

await imePreedit("nihongo", 7); // cursor offset in UTF-8 bytes
await screenshot(`${out}/preedit.png`);
await imeCommit("日本語");

const state = await inputState("profile.name");
if (state.buffer !== "日本語" || state.ime_preedit_len !== 0) {
  throw new Error(JSON.stringify(state));
}

const video = await stopWindowRecording(); // returns once the MP4 is finalized
if (!video.ok || video.dropped_frames !== 0) throw new Error(video.error);虚拟光标为什么重要
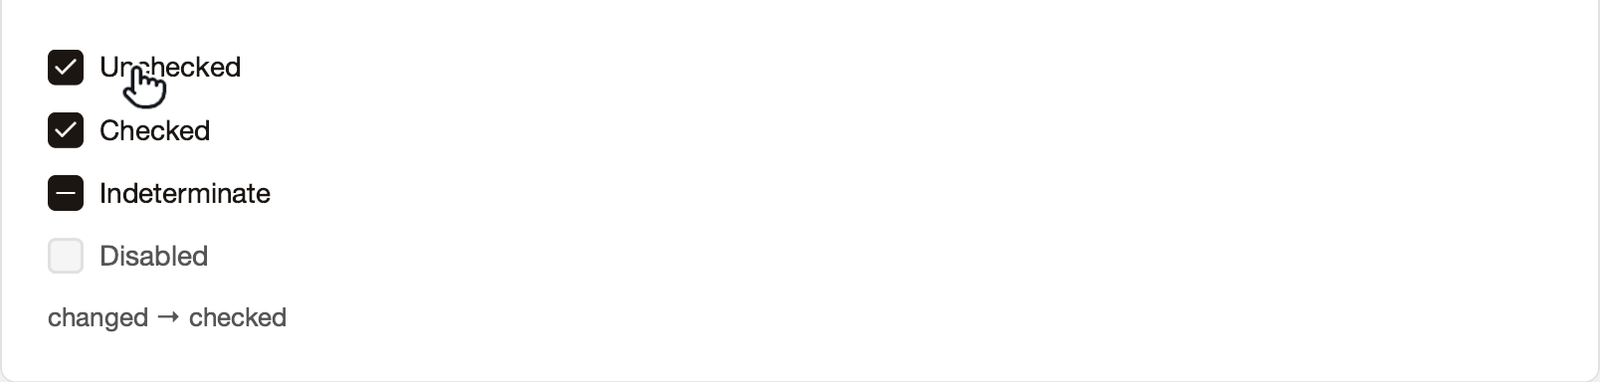
系统截图通常抓不到物理光标,屏幕录制又会带上桌面、标题栏和权限提示。Zenit 的虚拟光标是最后一层 draw-only overlay:不创建 Node、不参与布局或命中,只把当前自动化坐标与解析后的 CursorShape 画进应用的 render target。
输入框上是 I-beam,按钮上是 hand,拖动从 grab 变为 grabbing;遵守 pointer capture 与 cursor override。
按住时出现蓝色 press ring;原子 click 释放后保留 180ms 的 pulse。
Retina 应用内容加虚拟光标;没有桌面、物理光标、标题栏或屏幕共享标记。
拖动与多击
指针拖动用 mouseDown / mouseMove / mouseUp 组合,经过和真实鼠标相同的拖动阈值、pointer capture 与手势仲裁。双击、三击就是在多击间隔内连续发送 clickAt。
import { mouseDown, mouseMove, mouseUp, screenPos, sleep, clickAt } from "../zig-out/share/zenit/harness/client.ts";

// Pointer drag: press, move in steps, release. Real hit-testing and
// pointer capture apply; the virtual cursor shows grab -> grabbing.
async function drag(from: { x: number; y: number }, to: { x: number; y: number }, steps = 10) {
  await mouseDown(from.x, from.y);
  for (let i = 1; i <= steps; i++) {
    const k = i / steps;
    await mouseMove(from.x + (to.x - from.x) * k, from.y + (to.y - from.y) * k);
    await sleep(35);
  }
  await mouseUp(to.x, to.y);
}

const box = await screenPos("story.drag.box");
const c = { x: box.x + box.w / 2, y: box.y + box.h / 2 };
await drag(c, { x: c.x + 140, y: c.y + 40 });

// Double click: two clicks inside the platform's multi-click interval.
const pad = await screenPos("story.multiclick.pad");
await clickAt(pad.x + pad.w / 2, pad.y + pad.h / 2);
await sleep(160);
await clickAt(pad.x + pad.w / 2, pad.y + pad.h / 2);常用 API
tree · query(testId) · screenPos · focusedclickTestId · clickAt · mouseDown/Move/Up · scrollAt · magnifyAt · keydragAt(x, y, kind, paths)type_ · imePreedit · imeCommit · inputStateconsoleEvents · waitForConsole · clearConsole · stats · resetTimingscreenshot · startWindowRecording · windowRecordingStatus · stopWindowRecordingwaitForServerReady · waitFor · resizeWindowtree 返回完整子节点列表(不再每层只留前 50 个;深度仍以 20 层为限),结果超过 256 KB 的结果缓冲时显式报错,而不是返回半截 JSON。query 命中的每个节点带 effective_opacity(自身 × 全部祖先的 opacity,display:none 计 0),display:none 的节点带 hidden: true。等浮层淡入时轮询到 effective_opacity >= 0.99 再点击,比 sleep 猜动画时长可靠。typed client 的 QueryNode 接口目前还没声明这两个字段,读取时需要自己扩展类型。
drawable 直录
macOS 录制路径在 GPU 上把完成的 Metal drawable blit 进 AVAssetWriterInputPixelBufferAdaptor 的 buffer pool,再由 AVFoundation 编码为 H.264;没有 CPU 像素回读,也不需要「屏幕录制」权限。stopWindowRecording 是同步边界:返回时 MP4 的 index 与最后一帧都已写完。
fps1–120,默认 60ok · width · height · frame_count · dropped_frames · duration_ms · file_size构建与运行
Zig 的依赖选项是隔离的:下游项目要在自己的 build.zig 里把 test-mode 与 e2e-port 转发给 zenit 依赖,并调用 zenit.installHarnessClient(b, zenit_dep),把 typed client 安装到 zig-out/share/zenit/harness/client.ts。快速开始里的模板已经做好了这两件事。
# The template's build.zig forwards -Dtest-mode / -De2e-port to the zenit
# dependency and calls zenit.installHarnessClient(b, zenit_dep).
zig build -Dtest-mode=true

rpc_dir="$(mktemp -d /tmp/myapp-e2e.XXXXXX)"   # one private dir per run
ZENIT_E2E_FILE_RPC_DIR="$rpc_dir" ./zig-out/bin/myapp &
app_pid=$!

ZENIT_E2E_FILE_RPC_DIR="$rpc_dir" bun e2e/profile.test.ts
kill "$app_pid"# Inside the zenit repo: the Storybook ships as an .app bundle.
zig build -Dtest-mode=true storybook
rpc_dir="$(mktemp -d /tmp/zenit-e2e.XXXXXX)"
ZENIT_E2E_ISOLATE_POINTER=1 ZENIT_E2E_FILE_RPC_DIR="$rpc_dir" \
"./zig-out/zenit Storybook.app/Contents/MacOS/storybook" &
ZENIT_E2E_FILE_RPC_DIR="$rpc_dir" bun e2e/storybook.test.ts边跑测试边用电脑时,真实鼠标的移动、按键和滚轮会覆盖 Harness 注入的悬停位置。给应用进程设 ZENIT_E2E_ISOLATE_POINTER=1,test-mode 构建会丢弃系统的 mouse move / button / wheel / magnify 事件,只认 Harness 注入的输入;zenit 自己的 scripts/run_storybook_e2e.sh 默认开启,需要真实鼠标参与时设为 0。
正常发布不传 -Dtest-mode=true:test_harness.enabled 是编译期常量,Harness 初始化与 file-RPC 端点会被整个消除。
真实案例:本站的媒体流水线
本站所有截图和录像都来自真实窗口,由两个脚本生成:scripts/zenit/run-capture.sh 负责构建和进程编排,scripts/zenit/capture.ts 负责驱动与录制。
- 1以 test-mode 构建目标
在 zenit checkout 里执行
zig build -Dtest-mode=true storybook console-probe devtools-probe hello-button counter-reactive。 - 2每个场景一个私有 RPC 目录
用
mktemp -d新建目录,带着ZENIT_E2E_FILE_RPC_DIR在后台启动 .app 里的二进制,再用同一个目录运行bun scripts/zenit/capture.ts <scenario>,结束后杀掉应用进程。 - 3语义驱动并录制
capture.ts 直接 import zenit 的
e2e/client.ts,按 test_id 或树中的文本定位,以 30fps 录制,并断言ok且frame_count ≥ 2;某个 story 的交互失败时退化为通用光标扫过并记录警告,不中断整批。 - 4裁剪、转码、记录版本
用 ffmpeg 裁到 Storybook 详情区域并重编码为 H.264(faststart),写入
public/media,最后把 zenit 的 commit 写进public/media/REVISION。
ZENIT_DIR=/path/to/zenit scripts/zenit/run-capture.sh docs        # docs media
ZENIT_DIR=/path/to/zenit scripts/zenit/run-capture.sh stories drag  # one story clip